A MODEL ENGINEERING APPRENTICESHIP
Part two by David Carpenter

A MODEL ENGINEERING APPRENTICESHIP
Part two by David Carpenter
Just how should you go about starting model engineering. The secret of success, as with so many things, is in the preparation. In this first practical part of this series of articles we will give you the groundwork to get started, and prepare you for your first project. You will start building and if you do not have a workshop or tools, don’t worry. All that can come later. The thing is not to start with something big and complex, which will almost certainly finish up as a ‘part-completed for sale’ ad. If you are a qualified engineer, you will be able to skip some of the early stages. But they are designed for you to enjoy them if you do follow them.
OK let’s start.
This is an easy way in to model engineering. You don’t need a lathe, milling machine, loads of tools, or even a workshop.
First things first.
Somewhere to work.
Find a corner of a table somewhere which you can call your own without upsetting the domestic harmony. Ideally buy a cheap little table, sorry workbench, from IKEA or a workmate type bench with a bit of MDF on top – something you can stow away when not in use.
Next buy a machined kit. You will have your own ideas about what sort of kit you would like to complete, and here are a few ideas.
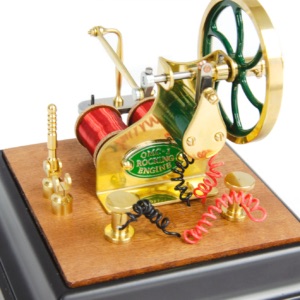
The Old Model Company produces a series of kits of engines based on early electrical technology. The OMC-1 Rocking Engine presents a bit more of a challenge than some of the Stirling engine kits around these days which can be put together in no time at all. The OMC engine needs a bit more than that, but the instructions that come with the kit are very clear, and all the parts are high-quality, prepared and organized ready for assembly. No special tools necessary.

To see more go to the website https://www.oldmodels.co.uk/ which will also tell you more about the fascinating early development of electric motors.
A great alternative, or possibly addition, to an electric motor would be a steam engine. And when it comes to steam engines you won’t go far wrong with one of the oldest names in the business, Stuart Models. Countless model engineers, including some of the very best around today, cut their teeth on a Stuart vertical or horizontal steam engine.
Stuart models are available in three ways. First, as a complete, finished, ready to run model. These are popular as collectors’ items for those without the time, or the inclination, to make one. Secondly, they come as kits of castings and materials to be machined and assembled. Naturally these are a fraction of the cost of the finished item. Finally, and just the ticket for the aspiring model engineer, they come as kits with all the machining done for you. Leaving you the job of finishing, painting and assembly.

For rather more you can put together a ready machined Stuart 9 which was the first model built by Cherry Hill, from unmachined castings, and included some of her own modifications. That is Cherry’s engine below.

To see what’s available go to http://www.stuartmodels.com/.
You will need a few tools: a screwdriver, some spanners, a few small files and a suitable paint brush. Otherwise, everything you need is in the kit.
Again the resulting model is something well worth displaying, as well as occasionally running. You can run it on steam or air. Air supplied by a small compressor (which will find myriad uses later in your workshop) is the simplest way to get it working. Alternatively Stuart Models and others sell ready-made small boilers to feed real live steam to power your engine.
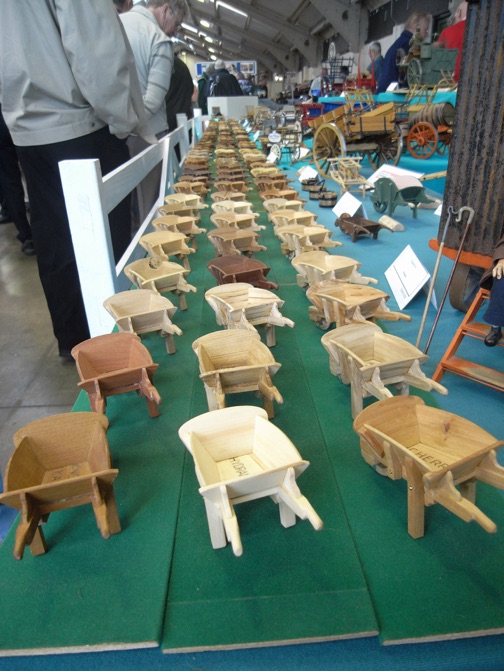
An alternative to a kit is to make a model from scratch that requires little in the way of tools. Visitors to model engineering exhibitions will be familiar with the work of the Guild of Model Wheelwrights. They have a little ‘apprentice’ piece in the shape of a wheelbarrow. You may have seen lines of these on display - all by Brian Young. Brian’s design for the wheelbarrow is available at barrow.pdf.

If you are not keen on wood, why not try it in brass, or some other metal? You will need a piercing saw with a supply of various grades of blade to cut the parts out, and small files to be sure of good shapes and to get a nice finish. Small files in this case could be needle files, and inexpensive ones at that, to be used on brass only later on. For saw and blades see: https://www.shesto.co.uk/search/?keyword=piercing+saw
These little barrows will get you thinking rather than following instructions for a kit and are also nice to have on display.
OK. So you’ve now made something and you are on the first rung of the ladder, and can’t wait to get on to make that loco or whatever your object of desire is.
But first you will need a workshop.
We’ll look at that next time. Meanwhile enjoy your electric engine, steam engine, or wheelbarrow.
Part one here. Part two here Part three Part four part five Part six Part seven

