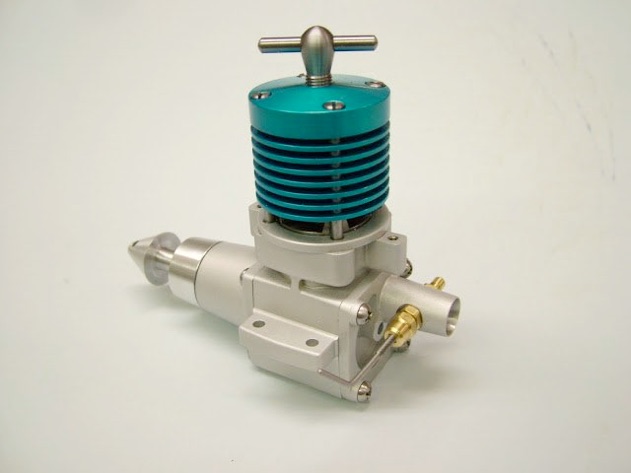
CLICK ON DRAWINGS TO DOWNLOAD - FOR PERSONAL USE ONLY.
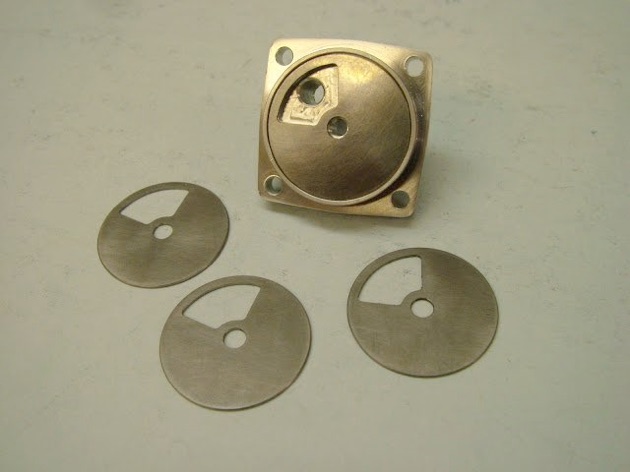
The wear discs were apparently an aftermarket part no doubt to reclaim a worn backplate face. In one which did not have the wear plate fitted the circular wear marks were quite prominent in the ali surface. The original appeared to be a stamping but these have been made by parting off some En1a of the correct diameter about 1mm thick then holding it in soft jaws and facing it to 0.8mm. The blanks were then lapped to a fine finish on the wearside using a pot magnet as a holder. Lapped on a lapping block to begin with they were finished by polishing on 2500 grit Wet and Dry on a ground cast iron surface.
Still holding it in the soft jaws the inlet segment could be removed. The edges were defined first - any error here alters the desired timing.
They fit into the recess in the backplate and are held by the rotor pivot pin. No means are there other than clamping pressure of the pin to prevent them rotating - obviously if they did it would alter the timing but that isn't something that's occurred so far
The rotor pins were turned from silver steel and screw cut UNF 8-32 L/H. (Only suitable L/H tap available). Nothing can be worse than silver steel for screwcutting. These were heat treated one at a time so as to give good 'positional' control when quenching. By plunging them into the oil squarely to the surface any potential distortion is kept to a mimimum - particularly at the narrow point where the thread runs out.
A piece of copper tube was tapped to hold the threaded end and the main body of the pin then heated to a bright red. Once up to that it was removed from the flame for a few seconds and allowed to cool to a dull red before quenching in oil. Doing this helps stabilize the temp through the part.
These couple of shots are posed but give some idea of the colours involved. Because of having to handle the camera this first image has the part somewhat brighter than would be the normal colour taken to - this is actually much too hot.....
.....this is more the 'red' ready for quenching
Once quenched the pins were polished back to bright steel and cleaned of all traces of oil before tempering in a tray of hot sand. The sand should be very hot before putting the part in as this helps ensure consistency if multiple parts are being treated. It is not a good idea to put more than one part in at a time as once up to temp required it's surprising how quickly it will travel through it's desired colour and once past - well!
Finished ready to fit to have the rotors fitted. Though they look near black in the image they are in fact a nice blue going on brown to look at in shop light - well pleased with the outcome.
The rotors were made from Tufnol but this time the rough diameter was turned to fit that clamping plate that gets so much use. It made the transfer from lathe to mill much easier for this part.
part nine part 10 part 11 part 12 part 13 part 14 part 15 part 16